Wednesday, December 30, 2015

It's been a Burda year: Dress pattern Burda 6853 in wool and ponte

It seems only fitting that my last post and garment of 2015 was made using a Burda pattern. I'm planning to do a year end wrap up but for now I will predict that one theme will be my discovery of Burda patterns. I will always find something to sew among Vogue patterns but now I add Burda to my list of possibilities. However  - either Burda envelope patterns or PDF downloads. I just can't deal with tracing from the magazine.
Onward to this dress, Burda 6853 envelope pattern. A Burda young pattern :) I don't know what it says about me but I find a lot of the ones I like are in the young category. Anyway - I saw a review of this pattern on Pattern Review and it looked like a great winter dress, plus I could envision using up an odd piece of fabric that was too small to make anything substantial but too much to be a scrap that I would toss out.

Red grey dress on me1

A quick picture right before Christmas Dinner. I think I can hear someone telling me to come back in the house as dinner was almost ready!

Burda 6853 envelope

I thought looking at the pattern thinking that it was separate pieces in version C, but actually it is the same as the top of version A and what is shown as lace in the pattern photo is an overlay. And it is only in the front. I thought about revising the pattern to make separate upper bodice pieces for front and back, but discarded that idea as too much work. So I just made the pattern as designed, and put the red part as an overlay in the front only. For the grey part I had a remnant of fabric from this dress I made last year for Heather. It's a really nice wool boucle so it made for a warm winter dress which is just what I was looking for.

red grey dress front on form

The cranberry red ponte is leftover from this dress. I left out the zipper as the wool knit is quite stretchy and the neck opening was large enough to get my head through. I did lower the neckline a bit in the front, it was really high, like a crew neck t-shirt which is not comfortable in a dress.


red grey dress back on form

A few fit notes.  It has princess seams so I took it in and shaped the side seams a bit. I used the Burda size 38 with some increase at the hips. You can see the difference from the pattern, my skirt portion starts higher than their version. I cut out the upper portions of the dress and sewed them together, then played around with a piece of the red fabric while wearing the upper portion to decide where to attach the skirt. I'm glad I did because the bottom band hit me at an odd spot and made me look short. (shorter).

red grey neckline

I didn't line the dress but made a facing that mimics the front yoke, using a knit lining fabric.
Note that this pattern is not designed for knits, although it worked perfectly. But it does have an elbow dart in the sleeve - which is kind of noticeable on the dress form and not something you see in a knit sleeve. It bugs me a little bit that the upper back is all grey. But it doesn't bug me too much as I have worn this dress quite a few times in the last two weeks!

redgrey side view


Christmas flew by and now the new year is almost here. I hope everyone had a great holiday and I wish you a Happy New Year. I have already started on my newest project and am thinking about taking a sewing moratorium in January - if I can exercise some self control. Just to get a bunch of other project done around here. We shall see.
Or not. and then start on all the other ideas rolling around in my head.

Either way - Happy Sewing to all and here's to a great 2016 in every corner of your life!

Beth


Red grey dress on me2

Saturday, December 19, 2015

Burda Wave skirt 12/2012 # 109 in wool coating

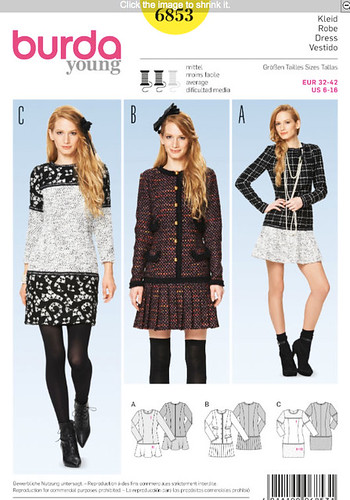
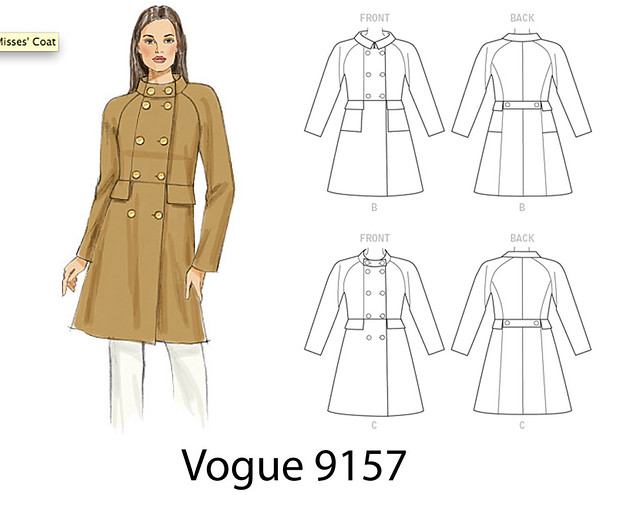
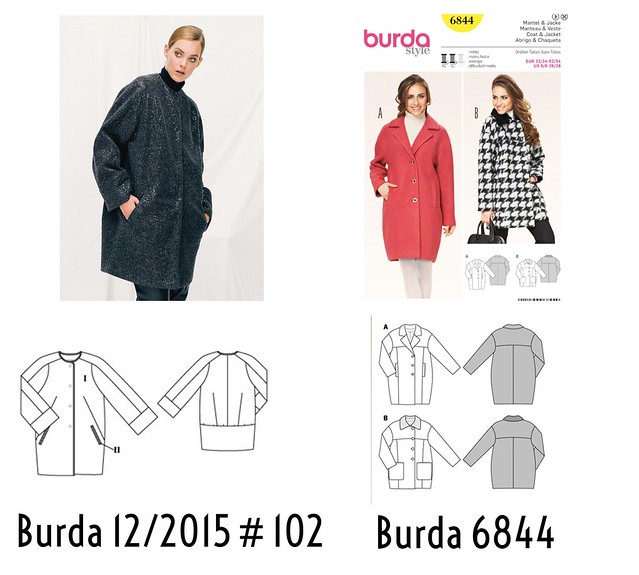
After looking at the 
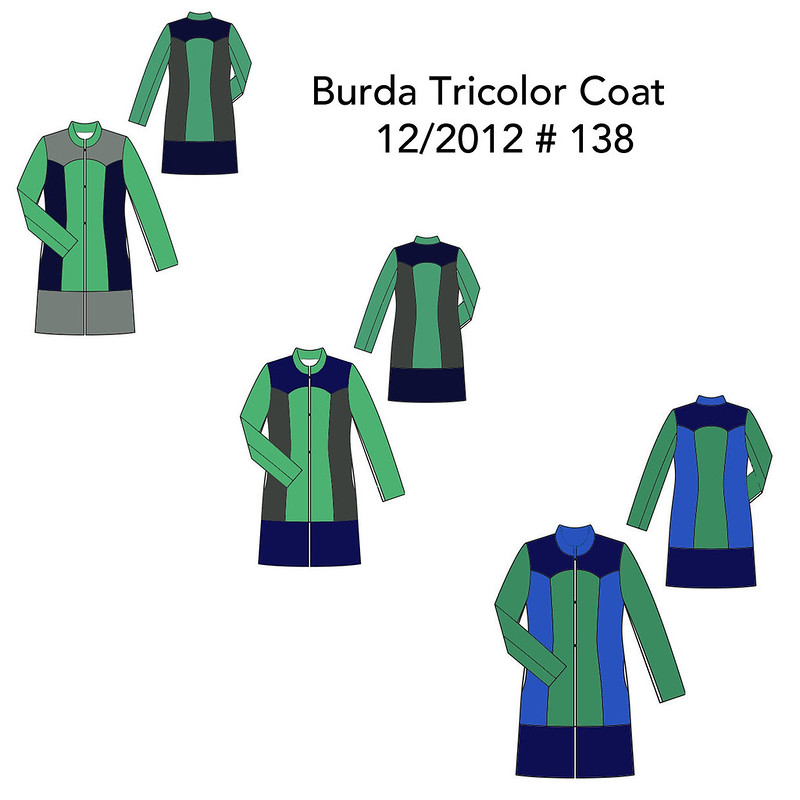
Tri-Color coat for ages, and finally acquiring the perfect fabric to make it I realized I would still have tons of fabric leftover. I hadn't clicked around to see the rest of the items in the original Burda collection: "Wake up Wool" where the coat first appeared but did so and found another winner. I really like the way they do their patterns in little collections of 5 to 10 patterns. Which I suppose is because their pattern magazine is in the style of a fashion magazine with editorial spreads. Some collections are mostly bonkers, sometimes they have a couple of absolute gems and sometimes they really succeed with most every pattern in the collection looking great and potentially a garment I would want to sew and wear. (and their plus collections are often even better, I give you this example of a recent one: Hotel Bar. Totally glam and gorgeous with one oddball).

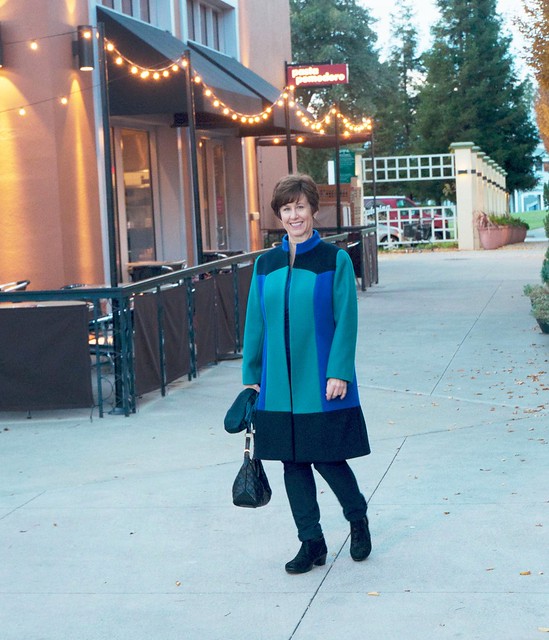
That was a long way round to say that I found another pattern in that collection to accompany my tricolor coat.  Also a big thank you to everyone for all your wonderful comments on my finished coat. I was sure  the color combo would not appeal to many people other than me, so I appreciate all your nice words so much. I have been wearing it a lot! And not shipping it off to anyone. A few readers here and on Pattern Review who requested I do so :)    By the way - I did enter into the Color-Blocked contest on Pattern Review, the voting is now open until 12/24.
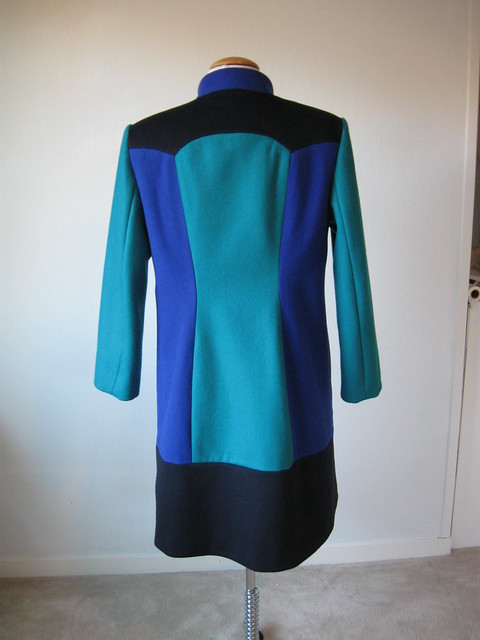
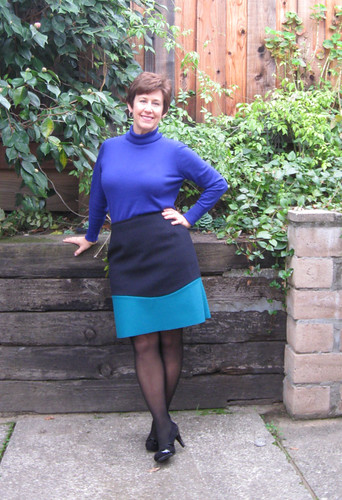
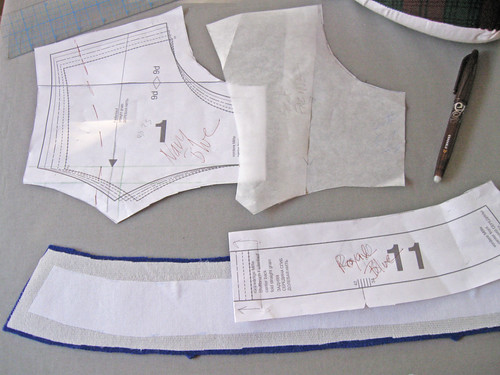
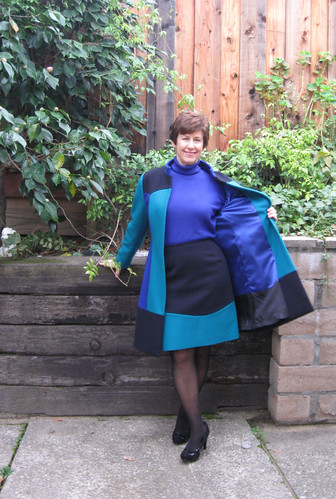
wave coat and skirt

This is the 
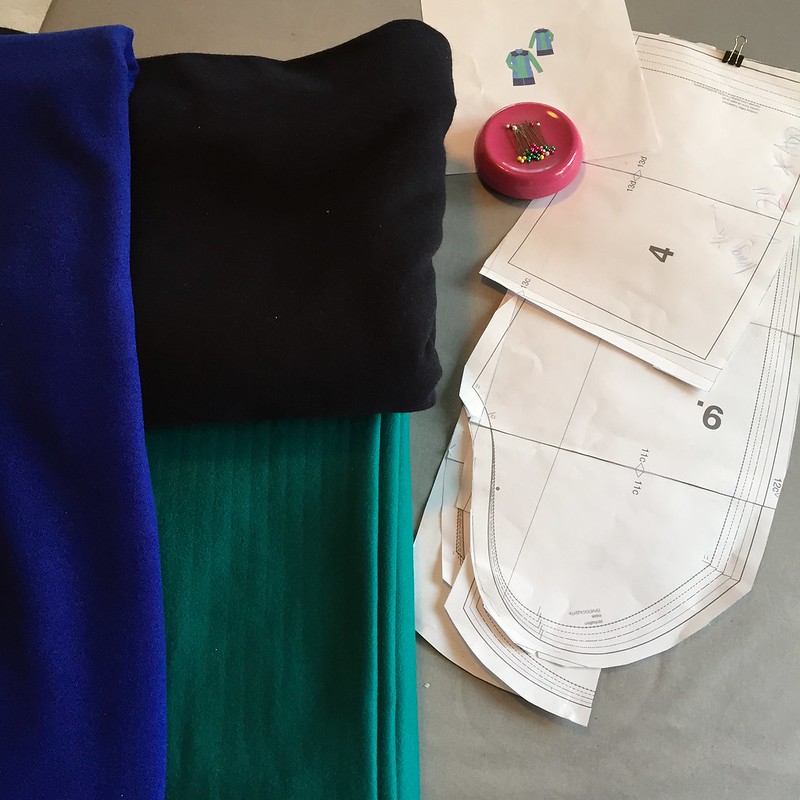
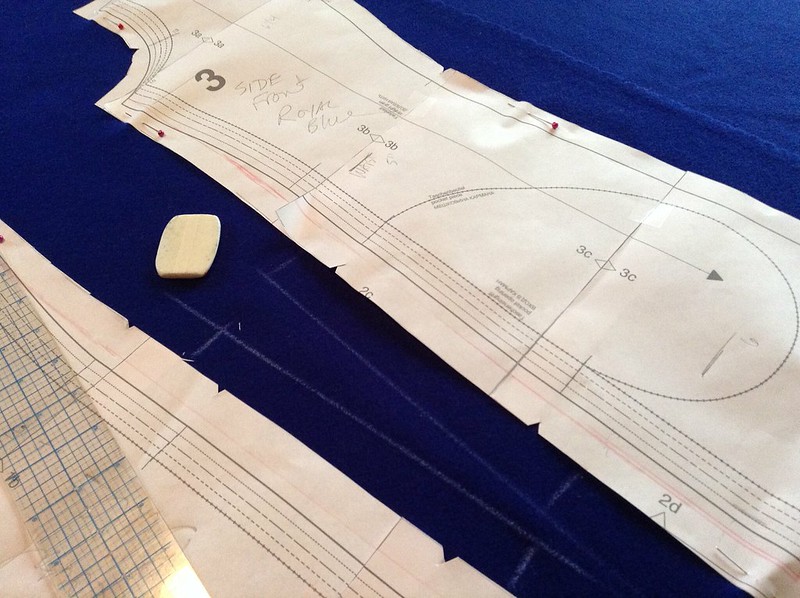
Wave skirt, Burda 12/2012 # 109. Which is going straight into my small collection of TNT patterns as it is a breeze to sew and fit beautifully. A tiny bit of extra study of the pattern pieces to make sure I got the wavy section right, but otherwise a very nice pattern that I could see adjusting for other things or even as the bottom half of a dress.


Wave skirt tech drawing 
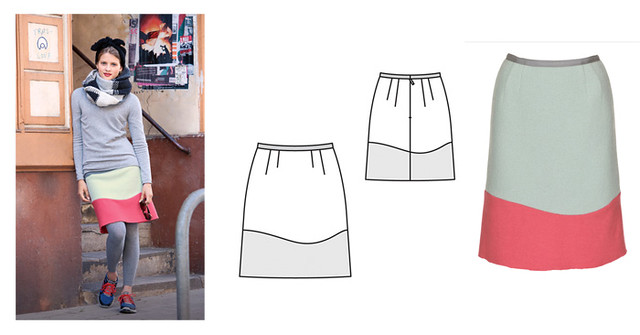
What I really liked about this pattern are the darts which give a great fit front and back. Also this pattern calls for fulled loden fabric which I suppose is felted wool? In any case my coating fabric seemed just right. And Bonus! it calls for no hem, which also is something you can do with this type of felted fabric. Of course that means I needed to get the length just right before cutting out. I did that by comparing to one of my other skirts and figured out the total length, which turned out to be similar to the pattern so no change. For size I cut out the size for my hip measure and took in the waist to fit.
In the tech drawing it showed a zipper in the center back but I thought the zip was on the side, and that is how I sewed it. Which actually seems better, so no seam bisecting the contrast wave at the bottom back.

wave skirt 

No waistband, I used my method of "waistband-less" skirt making, as I did with this skirt. 

skirt side view

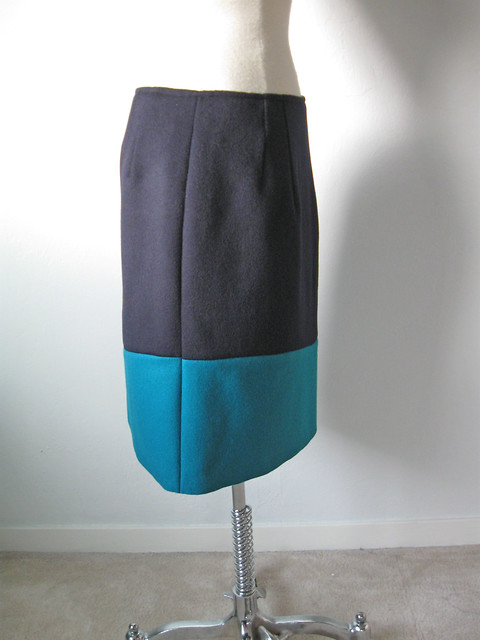
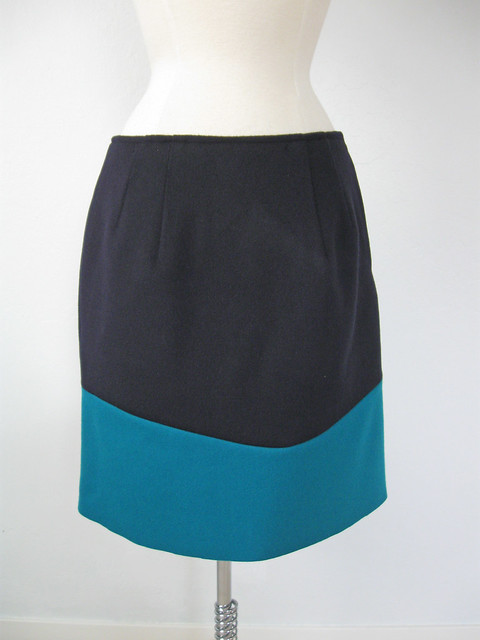
Side view. The only slightly tricky bit was making sure that the intersection on the side seams matched up perfectly for the color blocking.

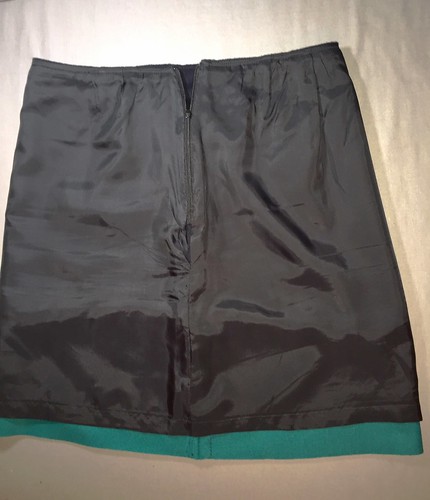
Inside view. I am often asked how I finish lined garments or what treatment I use on the seams. For the most part the answer is none!  I don't think a lined wool garment needs any seam finish. For winter weight fabrics serging just adds bulk and to me is mostly a waste of time, (exception made for all items sewn from denim :)  It is nice to use on prone-to-.ravel fabrics but otherwise I think not necessary. On a lined garment the lining should look good, but peeling back the onion to see the insides - who cares what it looks like there.

Wave skirts Wave skirts


I am not likely to wear any top or sweater tucked in like this but figured I would show how the skirt looks on me and the proportion of the two color sections.

wave skirt1

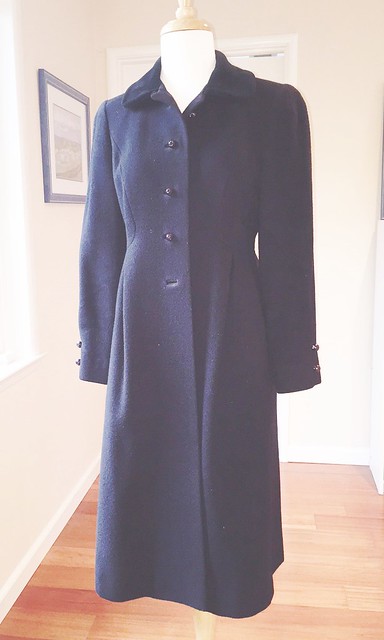
In my previous post with the completed Tri-color coat I said I would post some more construction details so here goes, a bunch of construction pics with some notes. If you like seeing how things are made then this section is for you.

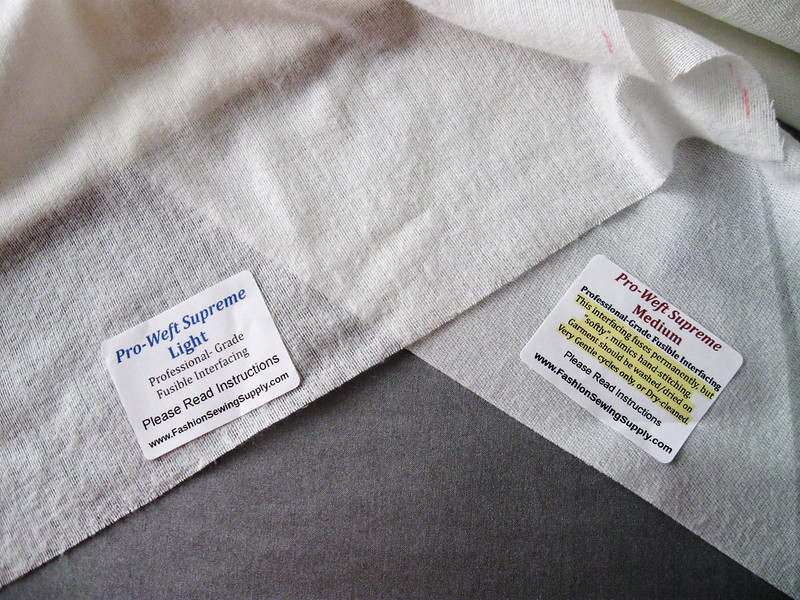
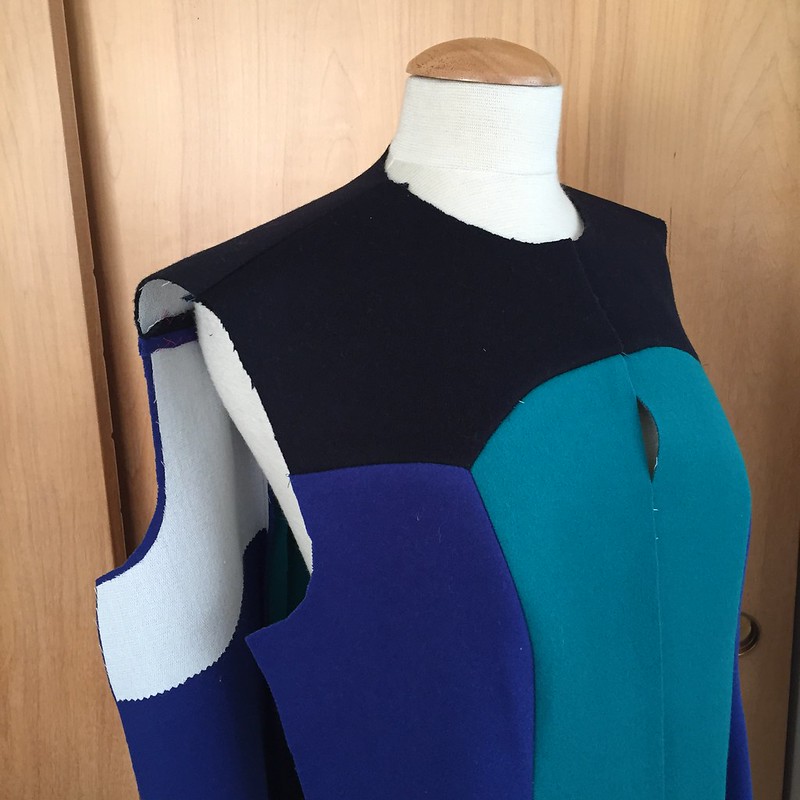
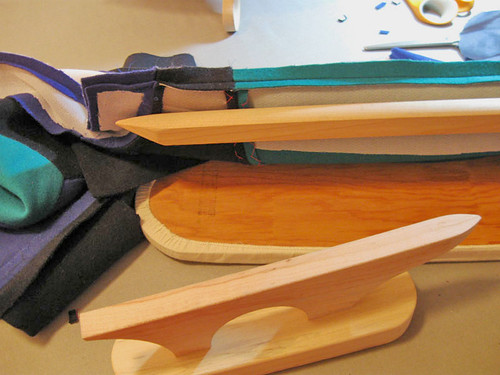
First up: I am an interfacing maniac. Coats need a lot. Or I can rephrase that - coats and jackets should have a lot of interfacing. More than you think. These fabrics were hefty enough that the interfacing was not as necessary as in a lighter wool, but interfacing the various sections allows for invisibly catch stitching down the seam allowances, plus I think the shoulders on a jacket should kind of float, or at least have some substance as opposed to sink and rest in the hollows of the upper body. Does that make sense?

tricolor inside on form

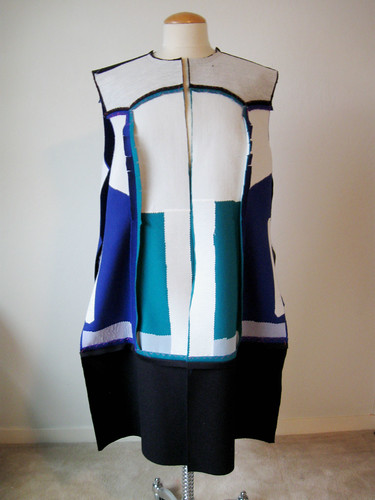
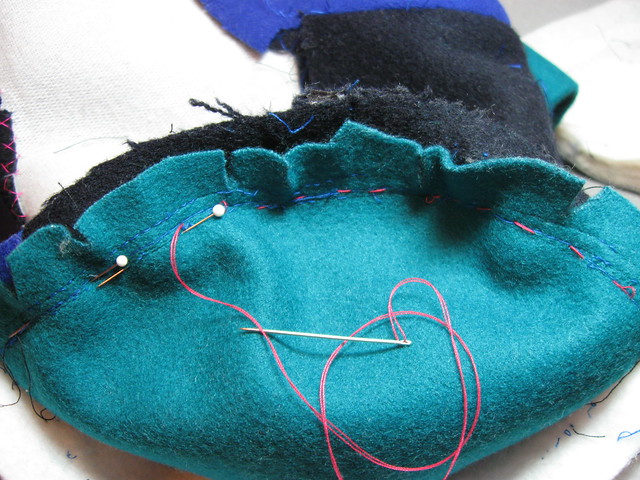
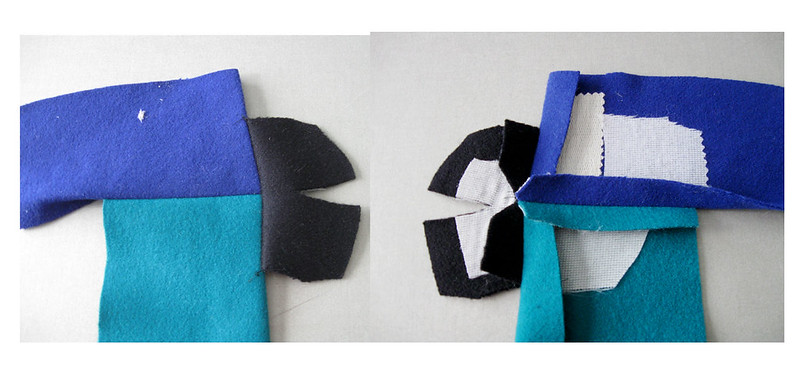
For the intersections of the yoke and the two color sections of the body, having white interfacing on the dark fabrics seemed like a necessity in order to accurately sew those junctions. The coat front on the left is sewn but not pressed, and you can see it is looking good already.

tricolor front seams


IMG_0008

tricolor coat shoulder section

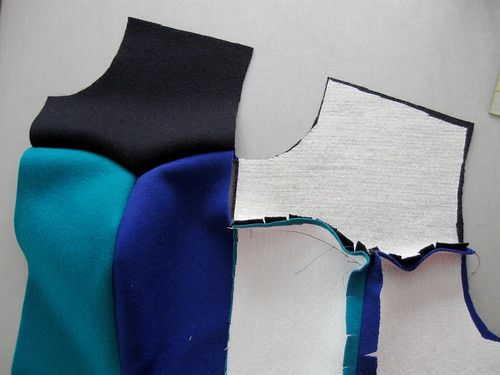
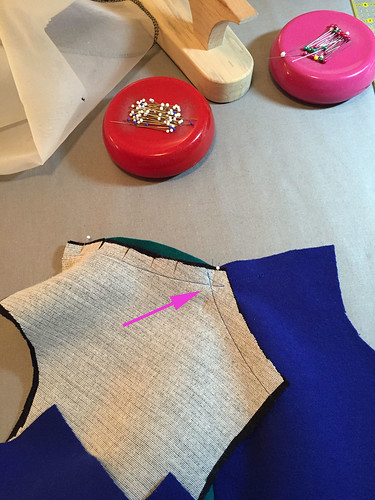
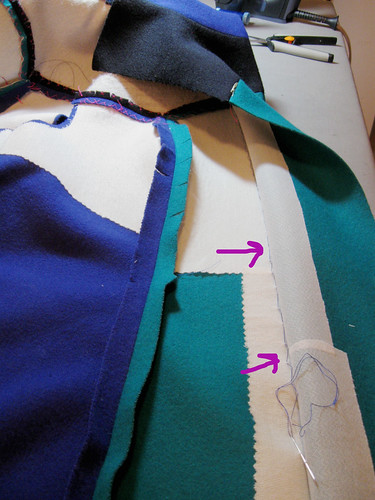
The pink arrow shows where the stitching ended, and then I started up on the other side. I could not see any way to sew this continuously across the yoke and have the seam allowances not all bunched up in the seam. Because you know I am a mad about  seam trimming and grading.

tricolor coat notch seam
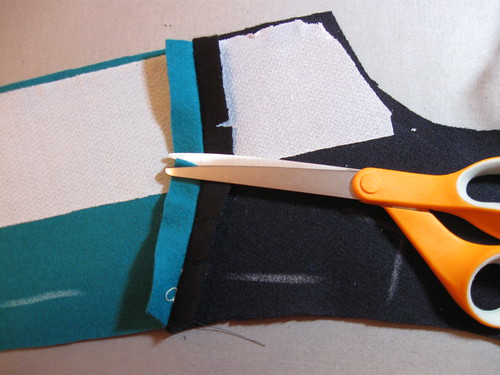
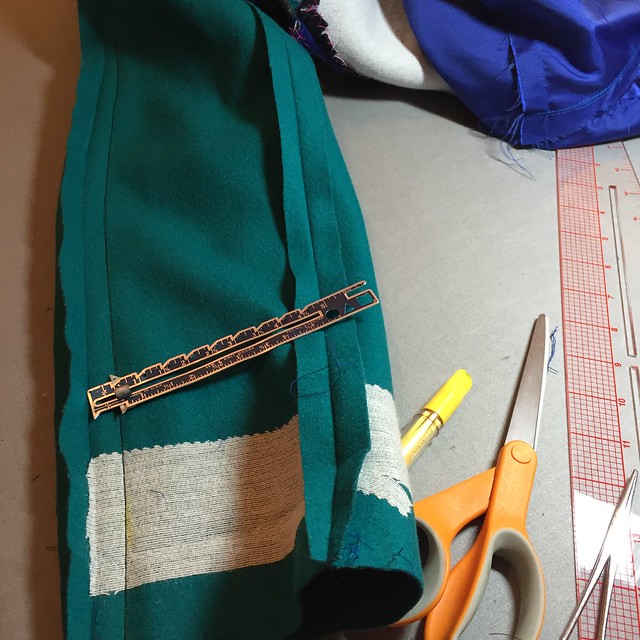
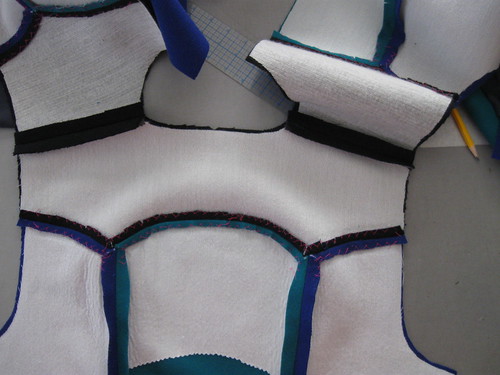
Curves need clipping. I clip before grading, just seems easier. Also note all my wax chalk marks designating wrong side of fabric. Once interfacing is applied then it is obvious but oh so easy to apply interfacing to the right side of a piece and then shrieking ensues.
Collar:  I put some extra interfacing just in the collar portion as I wanted it to stand up properly. That extra bit is a Shirt-crisp interfacing which I actually find too crisp for shirts (I suppose it is just right for collars on men's dress shirts) anyway I ordered it ages ago and never used it. But it pays to have a selection of interfacings. Only applied in the body of the collar, I trimmed away the seam allowance portions.

Tricolor coat collar interfacing

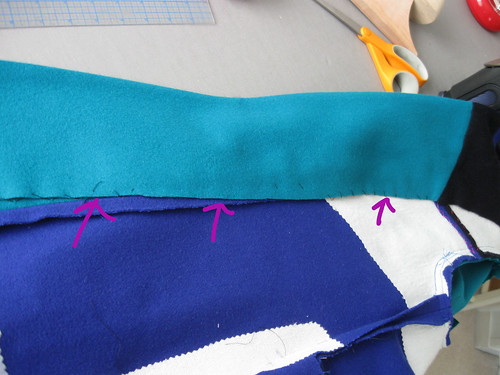
Here is the collar plus collar/front facing sewn onto the coat. I think I took this photo to show the color block seam matching which seemed critical to me at the time. After bothering to create the color blocked facing I guess it was important to sew it accurately :).

tricolor coat collar1

A few notes on pressing.

tricolor coat sleeve board seam

In front is the clapper but the real star in this image is my sleeve board which has convertible sections and the most used one is this long pointy piece. It is ideal for pressing long seams and front facings.

Once the long center fronts are pressed open, trimmed and graded, then pressed over the hand stitching begins. I think you either love hand sewing or consider it a major pain. I love doing it. I generally hand sew all linings into coats instead of bagging the lining. I like the control of hand sewing, usually I create my own lining pieces on the fly, and I hand stitch all the coat or jacket facings down to the coat body so actually bagging the lining is not even possible.

tricolor coat tacking facing2

This is the long center front of the coat. These thick fabrics wanted to pop open a bit no matter how much pressing is done, so I first took a long running stitch with silk thread along the inside (see pink arrows) to keep the front facing flat.

tricolor coat tacking front facing

Then I tacked down the entire facing with loose stitches to the coat body. Now it will not shift or move and the coat front will stay flat, no chance the facing/lining will roll outward.


tricolor coat lining view

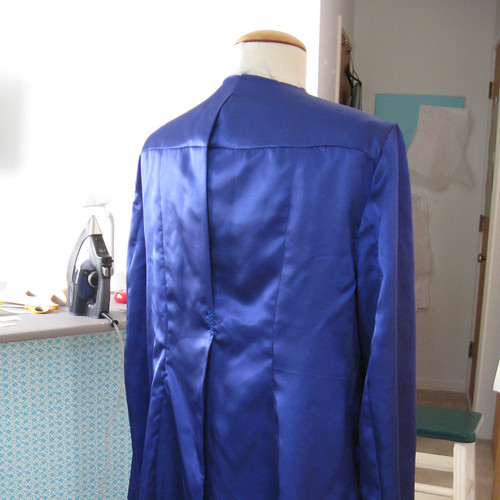
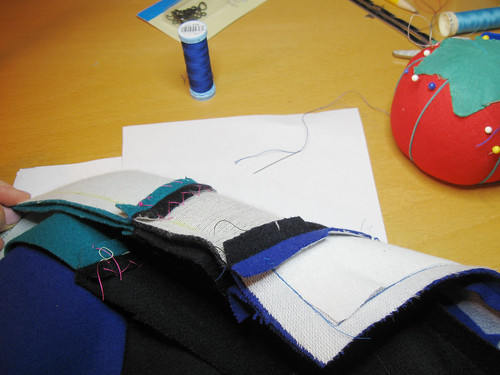
Lastly, the lining sewn up and ready to be hand stitched into the coat. I straightened out the curved yoke on the lining pieces, easier to sew. Also added the center back pleat, and continued the lining up to the collar as I usually do (seen here on this coat post)

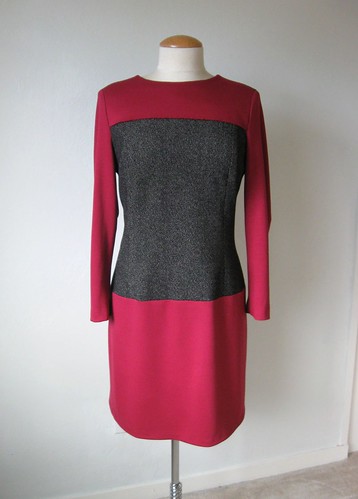
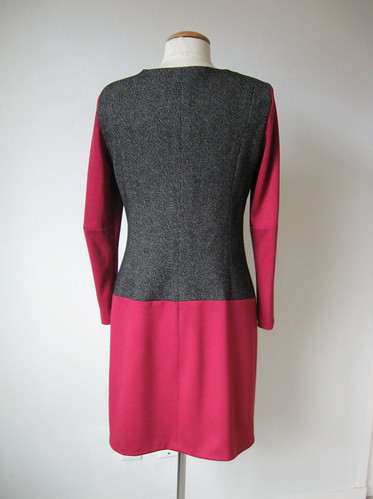
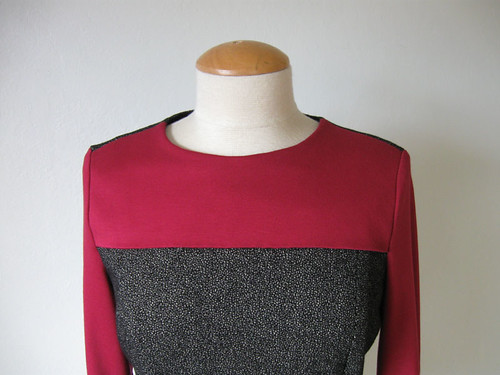
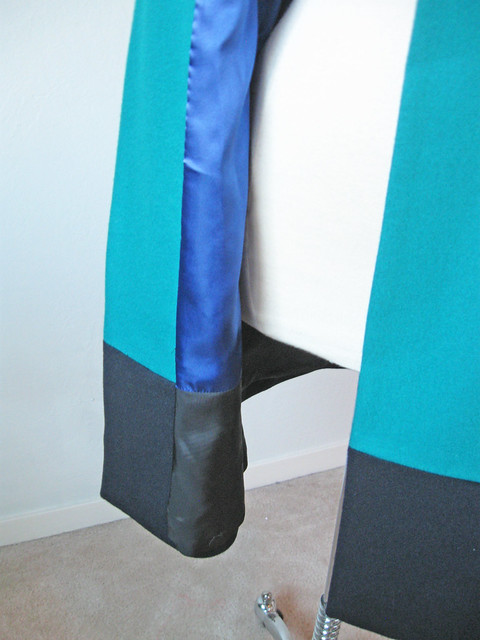
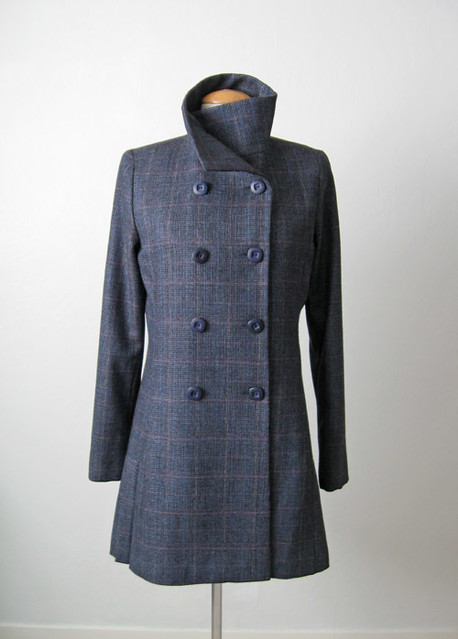
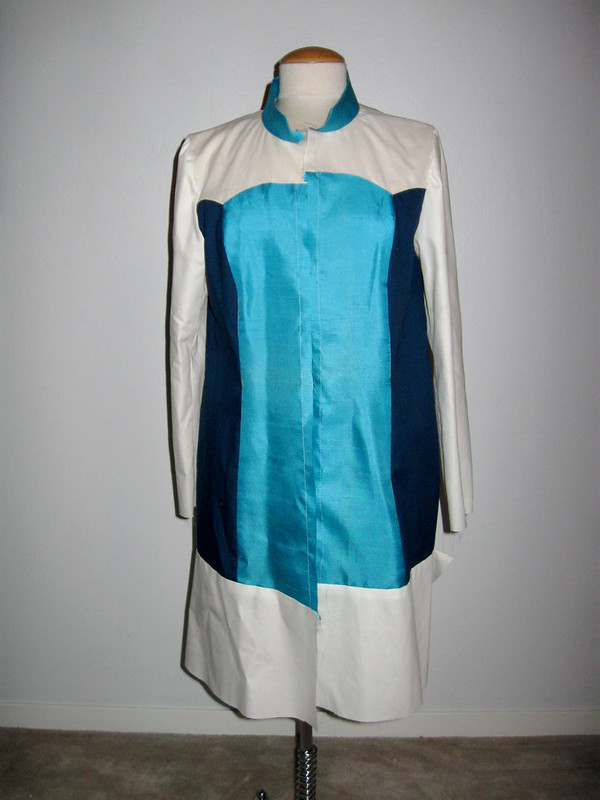
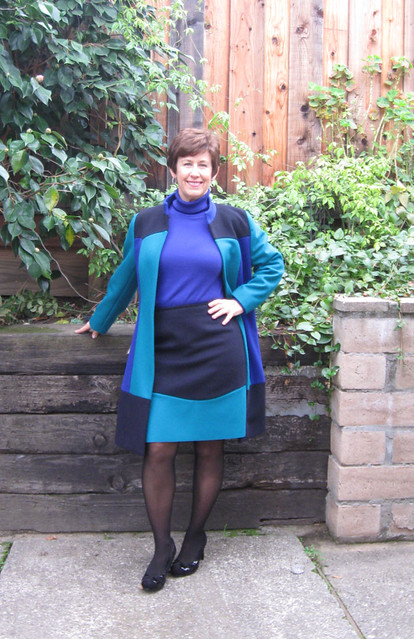
So final result - coat, lining, skirt. A color-blocking extravaganza. In case you are wondering why I did the skirt colors reverse of the coat - I just thought I would get more wear from the skirt being the dark navy. So various tops would go with. If it were the green it is a bit limiting.


tricolor coat lining

Whew this is a long post! and so many pictures. But I figured I took 'em so why not show 'em. Thank you for reading and commenting all year long - I really appreciate it and find so many wonderful new to me blogs to read via your comments.

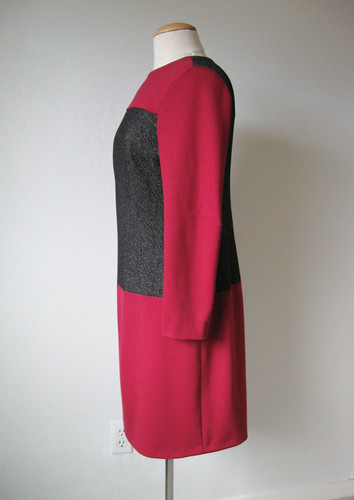
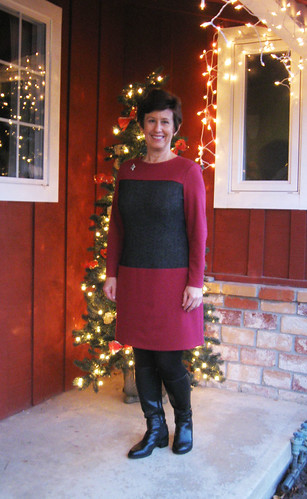
If you happen to look at my Instagram you will know that I have continued my color blocking obsession to one more item which I also have been wearing a lot. A winter dress in wool knit - comfy and warm. After that I'm turning to sewing easy-peasy knit tops and that is about all for 2015. However  I have lots more things to blog about and perhaps even a year-end review. Which I find strangely enjoyable despite serving no purpose other than to point out to myself all the patterns I have bought and not sewed up.


Happy Holidays to everyone, and I hope Santa brings you lots of sewing goodies!

Merry Christmas, Beth

Coat in front of tree

Wednesday, December 9, 2015

Burda Tri-Color coat 12/2012 # 138 completed

This is another of my posts where I feel it should have a subtitle. And the subtitle should be be "Try, Try, Tricolor coat".  Ok slightly pathetic excuse for a pun but this is a coat where I had completely finished it, then gone back and made a fit adjustment, not once but twice! So that makes three times I said "all done" and I am now fairly satisfied with it.
Pictures first and then a bit of explanation and some construction info.


coata5final

I love that jade green color and the quality of the fabric is so nice. My previous post is about the starting the coat, where I got the fabrics (the green one was a lovely gift) and some notes on fabric preparation, interfacing, etc.  I might do another post on more of the sewing details, and some tips on interfacing as it pertains to coats.

I have not tried to recreate the style of the pattern photo shoot before but often have been tempted so my photographer was willing to give it a try. Leave it to Burda to add one element (that chunky scarf) to obscure the garment's details.
Tricolor coat side by side view
So where do the three revisions come in?  I really had the coat completely finished, and placed on the dress form in my sewing room but I just couldn't stop looking at the width of the shoulders. It seemed too big for the dress form, so I would put it on and take it off trying to decide. Also once I had it sewn up but before the lining, it seemed to need shoulder pads even though the pattern did not call for them. So I put them in, and then finished the lining. That is when it started to look too big. Pattern notes: I made a Burda size 40 which is what I used for the Burda heather purple shawl collar wool coat but I am wondering if the thickness of that fabric took up some of the room and thus it was not too big. I think this tricolor coat in size 40 turned out too big. And then I studied the Burda measurements and realized a Vogue size 12 which I usually start with probably corresponds better to a Burda 38. So my eyes were not playing tricks on me, it was too big.

Here is the back view so you maybe see what I am talking about. I have only one other issue with the pattern, where the back upper yoke attaches to the panels, it seems a bit too big there, or it could be something I did but I made it work.

tricolor coat back view1

So I decided to narrow the shoulders. Meaning I had to detach the upper portion of the lining. Which I always sew in by hand so it wasn't that bad to do.

I moved the top of the sleeves in by about 5/8". First by unpicking them, from about 4 inched down from the center top going toward the front and back. Then I shifted them inward, making the shoulder seam shorter. BASTED in place. Tried on, did some little adjustments here and there. Then machine basted. Tried on again just to make sure everything was right. Measured the length of each shoulder seam to make sure they were even. Then stitched them up on the machine. Re-attached the sleeve heads. Tossed away the shoulder pads (yay!). Re-attached the lining. And satisfaction :)


sleeve fixing

Here is a look at the collar and the closure, which are large hooks. I thought they would bug me but they seem fine. The most important thing (Ok one of the important things) was to sew them perfectly so the color blocking would line up just right down the center front.

tricolor coat front upper

And the side view. Here is where need for the second adjustment became apparent. Darn that Burda size 40. The sleeves were too wide, particularly in the bicep. So once again but in a different place, I unpicked the lining sleeve hem (also sewn by hand, so not difficult to undo). and then pulled the sleeve through the bottom opening (I do not bag the lining so the hem lining is not attached to the coat hem - just never have done it that way - and makes adjustments a lot easier). I narrowed the whole sleeve by 1 inch total (taking a half in seam tapering to nothing where it attached to the armhole). And I liked it soooo much better. Perfect. and a live and learn moment to compare things to other garments that fit well (which I always tell people to do but should have done in this instance myself).

Sleeve adjustment

A few details on the facing/lining. The pattern had a one piece facing down the front, I think the instructions said to use the same color as the sections in green, but that just bugged me. I thought the facing should continue the color blocking so I had to make it that way. Easy enough to use the pattern pieces from the color blocking to make facings. Also the pattern front facing was about 2 inches wide which seemed awfully skimpy so I made it similar to the front section. Easier to show than tell so here it is.

tricolor coat facing color blocktricolor coat hooks1

Just for fun  - continuity - I did a bit of color blocking on the bottom of the lining so you can see the bottom band is black to continue that bottom panel.

Looking through my Flickr album I do have more construction pics so I will do another post on some more sewing details, plus this outfit is not complete - one more piece from this Burda pattern collection.

Summary: this pattern is one I kept going back to since I first noticed it, maybe 2 years ago? Once I had the green coating fabric it all came together and I am really happy with it. The colors are my favorites and I think it looks great with jeans or more dressy outfits. Now I am 99% satisfied with the fit and will know for next time to start with a smaller size and go from there.  By the way, I took these photos after narrowing the shoulders but before narrowing the sleeves, so you can see they look a bit wide. When I take pics of the second item I will show the better sleeve fit.

I am entering this in the Color-Blocking contest on Pattern Review so you might see it there :).

Thanks for all the great comments on my previous post about coat patterns - as I said, the Pattern Whisperer is all for fun and a good way to discuss a particular category of patterns, and to look for features that make them easy to sew and/or fit.

Up next, I have some dresses I sewed for my friend Heather to post and then I think I will settle down with some easy-peasy knit tops.

Happy sewing,
Beth


CoatA10

Thursday, December 3, 2015

The Pattern Whisper recommends: Winter Coats

Before the polar vortex hits your part of the world you may have winter coat sewing in mind. Since I was in the midst of making a new coat I mentioned recently the idea of a pattern whisperer post on coats and the response was positive. So I have rounded up a few coat ideas with my thoughts on fitting and ease of sewing.
Full disclaimer here  - I mostly sew with Vogue and now Burda (both envelope and magazine downloads) so the choices from those pattern lines. I really like Burda in all forms lately for outerwear, they seem to have more choices in coats and cover all size ranges with stylish and wearable options. Also I tried to find coat patterns that are actually suitable for wearing in the cold. I made that Burda portrait collar coat last year and someone commented that it was a "fashion" coat not a winter coat, which is understandable when you look at the open neckline. Actually it is funny because that is the warmest coat I have - due to the thick fabric and with one more button or hook you could close the collar and be nice and toasty!

It seemed strange to me but quite a few of these patterns are a little dull as pictured on the pattern, and this is where imagination has to step in. I think for coats it really pays to look in stores, try on some various colors, shapes etc. While a black coat will last in your wardrobe for a good while, there are a lot of neutrals that work really well for coats and depending on your typical color scheme grey, dark red, deep purple, navy or a camel color are also really good for a coat that you can wear with a lot of options. Usually for dresses or tops I don't make a muslin but for a coat it is a must. Just so much better to get the fit resolved before you cut into your nice fabric. And coating needs interfacing. I will have some details in my next post about interfacing although you can look at some of my past posts to see more on that.

First up a newish pattern from Vogue 9157. This has a lot going for it in terms of ease of sewing. It might look like a lot of pattern pieces but I find that last stretch of sewing a coat is kind of a wrestling match - usually in a heavy wool it can get really bulky and awkward. I could see constructing this one in the upper and lower half, and then attaching. Also raglan sleeves - if you have had some trouble with setting in a sleeve in a thick wool this would be much easier. I used to not like double breasted coats but am coming around a bit. Cute pockets also on View B.  (View A is a jacket length). I'm sure that View C has in seam pockets. The kicker for this pattern is that it comes in cup sizes which saves some work in the fitting.  No reviews that I can find which is a suprise but someone is probably sewing it up right now.

Vogue 9157


Next up is a pattern that might be a bit hard to find. Simplicity 2311. I posted this on Instagram not long ago and mentioned that it was a great pattern but discontinued but Simplicity commented that it still available. I made it a few years ago and love how it turned out. The tech drawing had me worried about the size of the lapels but I found them to be perfect. Proportion wise, fit etc this pattern is a winner, also I didn't find any exessive ease or other issues that can be common with some Simplicity patterns. A few years ago they had a lot of cute coat patterns but the choice has dwindled from them lately. I also like that this pattern had single or double breasted, princess seams front and back, choice of different collar options. I like patterns with a lot of options!


Simplicity 2311


Ok, here is the one that might be a bit of a sleeper, Butterick 6141. Something about how it looks on the model  - and even in the tech drawing is kind of frumptastic, but I think this coat has a lot of potential. The example just looks too big in the waist for the model, picture it with the waist nipped in a bit more, which would then emphasize the flare over the hips. Very retro in a good way. If you like fit and flare dresses this might be the style for you.  On the plus side, it has shoulder princess seams - great for fitting over the bust, choice of collar options, even a hidden placket option where you can use large snaps for those who are just over doing buttonholes in thick wool fabric (we have all been there). This pattern with a better fit could be a really nice vintage inspired look.

Butterick 6141 coat

To illustrate my point on this Butterick pattern I took a deep dive into my closet to photograph this coat which I did not sew. My mom bought it for me when I started my first real job in San Francisco. But is the same idea as the above pattern, princess seams (although these are armhole princess) and then those release pleats at the waist creating a slightly full skirt and giving it a nice hourglass shape. We bought this coat downton at Joseph Magnin's which doesn't exist anymore (sad). It has a velvet collar and bound buttonholes, plus the sleeves are slightly full and then end in pleats at the wrist which echo the pleats in the skirt. I love release pleats  - or to be accurate I think they are release darts (darts which don't go to a point). Anyway - that is a feature I have always liked. The very popular Anna dress from ByHandLondon has that type of dart in the bodice and if you get the fit right it looks pretty and a bit vintage-y.  So........does anyone else see the potential in that Butterick pattern?

vintage black coat1


Moving on to a pattern where I have no doubts, this Burda plus pattern is so sharp. The model looking so gorgeous from head to toe might have something to do with it but oooo a red coat!. Plus traditional menswear overcoat shaping, nice lapel, welt pocket, walking pleat in back, two piece sleeve. Love it. And this is a Burda Plus pattern. (Burda Plus has soooo many good patterns  - ok they have the requisite odds and ends with goofy styling but really - lots of great choices available. My only hesitation  is those darn "dior darts" which can hard to sew in ponte or something that doesn't want to press but seem to work better in natural fibers, especially in a lofty wool which you can steam to get nice shaping.

Burdastyle 01-2014#130

For a relatively new sewist or if you are a little worried about coat sewing, I think this Burda Easy coat is so cute and comes with (allegedly) complete instructions for the new sewer.  I really like the version on the right, it has a snap front, high collar, interesting darts front and back and one drawback - faux pockets. But the pocket flaps are cute and I would put side seam pockets to get around that little issue. I am not a fan of collarless coats (short haired girl here - neck is always cold) but that coat has my number one sewing dislike - separating zipper. So go ahead all you zipper fanatics. For some reason this is just the top of the list of things I will never sew, I just hate sewing them and don't really like wearing them. But I admit they do look great on some garments. Oh well.....

Burdastyle Easy Coats

Here is another Simplicity, 1015 pattern that ticks a lot of boxes for being both current and practical, yet the pattern envelope styling would have me running for the hills if I had not scrutinized it a bit more.

Simplicity 1015

Looks relatively easy to fit, and really easy to sew with slouchy shoulders instead of set in sleeves, princess seams, a nice big collar for warmth, fastens with a belt although you could add buttons or snaps as well. This is the first coat pattern I have seen in ages that has included the pattern for the button in/out extra warm lining layer. I have had coats with that and they are kind of handy - makes them more of an all weather coat. And if you sew one coat you want it to be useful for a long time, right? Although what is happening with that View B on the left, with the grey and black. That is some pitiful color blocking. also is she wearing knee socks? I don't even want to know.


Next are my picks for the comfy coat that feels like a blanket but looks great paired with the right pieces. The one on the left is a Burda downloadable and the one on the right is an envelope pattern.

Burda coocoon coats
They are similar in silhouette but the one on the left has a more cool vibe, and interesting seaming. The one on the right looks easy to sew and fit and would make a great warm casual coat in a tweed or check as they show. I suspect it doesn't really take all that much fabric which could be good. The collar is actually more like a shirt collar than a typical lapel, so if you have sewn a shirt you could definitely sew this coat.

I have to give a shout out to a couple more great coats. First the Quart coat from Pauline Alice patterns, I sewed this last year for a friend and it is a gorgeous looking coat. Slight warning - check the length as it is on the short side so if you want a knee length coat you may need to adjust. But it has those super cute pleated insets on the sides. Love! If you love plaid give that a try - but this falls into the category of a supposedly fun thing I will never do again (so I say).

front buttoned collar up copy

Another coat I recently saw almost made it to my list but I was trying to keep it short, however if you want a feminine, fitted style check out Margo's recent coat, which is Burda 6772. I love the idea of a dressy coat and this one is perfect to brighten up the winter.

It took me a while but I am now convinced that if you want a good coat pattern, try Burda first! they have a good variety, casual, traditional, formal, fashion-forward and lots of choice across the whole pattern size range including plus size. And their sleeves seem to be very well drafted.

Here are links to the Burda coats I have made.

BurdaStyle book coat in blue wool.
Burda plus coat in black wool.
Burda magazine pattern in heathered plum wool.
Burda magazine tricolor coat - in process :)  up next on the blog.

So are you sewing a coat this season? what are you waiting for - winter is upon us!

Happy December sewing,
Beth


Friday, November 27, 2015

Burda Tri-Color coat 12/2012 # 138, part 1

A few autumn leaves, a couple of frosty nights and my sewing mojo is back. With a chill in the air coat season is finally here!
Do you ever have a pattern that have not bought but keep returning to? Over and over again, thinking about, wondering what fabrics might work, evaluating if it right for your wardrobe? This BurdaStyle pattern is from 2012 and I have probably been looking at it since then. I don't get the magazine but I always take a quick peek at their emails showcasing the new pattern collections so maybe I first saw it there.
Recently someone gave me a gorgeous piece of wool coating and I wanted to use it for something really special. Here is the link to the pattern page.

Burda coat page

The gigantic scarf is obscuring the collar details but fortunately they show it in the other image. And this pattern led me to a discovery that may be well known to you but something I never noticed before. More on that in a minute.

Back to the fabric. That beautiful green wool was given to me, it is a perfect weight of coating fabric. Already pre-shrunk and sealed up in a bag - thus you can see a few wrinkles which pressed out perfectly. I started thinking about combinations for the tricolor coat and remembered that I had a very heavy wool coating in my stash which - wait for it - I bought at some rummage sale or something like  that. It is a 4 yard piece of super dark navy blue wool coating. Just sitting in my stash until needed :)
And I probably paid under $10 for that. So....two fabrics ready and one more needed.

Tricolor coat pics

This is where my silly little discovery happened. I often do a screen capture of the technical drawing image from pattern websites, either to save for a blog post, or to print out and color in with pencils, just to play around with fabric options. This time I had the drawing open in Photoshop and clicked on the paint bucket tool, filled in on the coat and to my surprise it just filled in one section. So I changed color and filled in the other sections. As with so many features in Photoshop (and many many other programs) trial and error or happy accident or crazily frustrated random clicking results in some new epiphany. (or possible erasure of an hour's worth of work but we won't focus on that now). So this may be a well known feature of the technical drawings but it was news to me. And what a perfect pattern to play with this feature.


coat color idea2

I was thinking grey for the third color but my newly found coloring tool helped me decide on something a bit brighter (oh what a surprise, when do I choose the understated). Although the grey is nice and I could imagine this coat in shades of all grey - that would be very sharp looking. So something in the sapphire blue was the winner. Which I didn't have so I had to order fabric. Fortunately I found a perfect choice at Gorgeous Fabrics, a wool coating for about $ 23 yard. Just needed one yard so in the shopping basket it went and you can see it above.

I did make a muslin of this pattern before I cut out my nice wools. Using some scraps of various things and not doing the colors in the same array as the pattern, but I just wanted to check the fit and length. I cut out the Burda size 40 with about an inch added at the hip on the side seams and the fit is spot on. Can I take a minute to rave about the Burda sleeves? I have now made a few Burda jackets and so far their sleeves are really great. Although long! which I guess is better than too short.

tricolor test muslin

Sewing this coat I have taken a lot of photos - so expect a few more process posts along the way.
Here is the first on my sewing process. When it comes to linings, whether in the jacket or coat, or just the pockets, I am not a fan of novelty linings. Inside jeans or shorts it looks cute to have some contrasting cotton and that's a good way to use up scraps, but when it comes to any "serious" coat (defining serious as something I put a LOT of work into and intend to last years) I want the pockets to disappear, or be hidden and have no chance of peeking out.

Pocket seam allowance

So for the pockets which are in the side seams on this coat, I add an extra section of fabric and then sew the pocket bag onto that, which serves to have the coating fabric extend about 1.5 inches into the pocket so the pocket lining stays hidden. Although I did use a dark navy for the pocket lining so it is not very visible anyway.
Sewing process item #2, interfacing. While all these wools are quite thick and this design doesn't need much support (no lapel or traditional collar) the 3 fabrics were slightly different in weight and thickness. I wanted them to all behave the same way so the method to achieve that is interfacing. Also my muslin test showed me that sewing those curvy junctions was very tricky and needed some stabilization.  More on this in my next post but for starters I pulled out all kinds of interfacing and did some tests.

interfacing choices

I always do tests on my fabric and interfacing combos, not just applying the interfacing but then stitching the fabrics together in various combinations to see how they go together. Sometimes I am surprised at what works so the test is always worth the few minutes it takes. For most wools I use this Pro-weft interfacing from Fashion Sewing Supply (note I just got an email this morning they are having a sale, 15% off.

Here is the sample I played around with, front and back.

seam interfacing comparison

I tried to create a section that matched the pattern where the 3 colors were joined together, and also included a curve, which I had to snip, making it look like some kind of abstract art face or something. But you can see that the various weights of interfacing applied, then I stitch the pieces together, including where there is interfacing because you want to see how the interfacing does in the seam as well as in the body of the garment. I ended up using several different weights of the pro-weft as well as some knit interfacing in other sections which I will show in a subsequent post. And that image on the left includes a little speck of interfacing on the blue section - something about this wool coating catches every little spare thread or speck of interfacing, which I noticed here on this test and had to be really careful of when I did apply to the real pattern pieces. Also late night interfacing - of course I fused a big piece to my press cloth because it was glue side up. Which is a good indication that it is too late to be sewing and time to turn out the lights, unplug the iron and get some sleep. Also - yay for fusing to the press cloth and not the iron. Thank you Mr. Press Cloth for always being there :).

And now a little sneak peek of the coat in progress.  Lots more details to come for readers who comment that they love to see the in-process sewing and technical details.

Tricolor coat pics

This morning I got some Christmas shopping done, so civilized with my cup of coffee and my laptop. Unfortunately the "one for them and one for me" habit is hard to avoid. Oh well.....

Now off to the gym and then perhaps some garden work is in order. Or I could stay inside and sew. Decisions, decisions. Oh who am I kidding, I will probably sew.

Happy Thanksgiving weekend and wishing everyone delicious leftovers  - one of the best parts of this great holiday
Beth